Good garbage disposal maintenance comes down to three habits: run cold water before, during, and after every use, feed it the right scraps in small amounts, and clean it weekly and monthly with ice, citrus, and baking soda and vinegar. Consumer Reports and InSinkErator back this routine, and it’s the same standard Another Cycle Appliance Repair sees separate the disposals that last a decade from the ones that fail in three years. Call a professional when you see a leak, especially from the bottom housing, or when the unit trips its reset button repeatedly.
TL;DR:
- Proper disposal maintenance involves running cold water before, during, and after use, feeding small amounts of food scraps, and cleaning weekly with ice and citrus.
- Avoid putting grease, fibrous vegetables, starchy foods, large bones, eggshells, coffee grounds, and non-food items into the disposal to prevent clogging and damage.
- Weekly ice and salt cleanings, monthly baking soda and vinegar treatments, and safe removal of the splash guard prevent odors and buildup.
- Replacing a disposal is recommended if there are bottom leaks, repeated reset trips, slow grinding, or costly repairs exceeding half the price of a new unit, especially after five years.
- Clear safety procedures include disconnecting power before work, wearing gloves, and calling a professional for leaks or internal seal failures instead of attempting DIY repairs.
Table of Contents
- What Can You Put in a Garbage Disposal Safely?
- How Often Should You Clean a Garbage Disposal?
- How Do You Deep Clean a Garbage Disposal Safely?
- How Do You Fix a Jammed or Humming Garbage Disposal?
- When Should You Repair vs. Replace a Garbage Disposal?
- What a Professional Inspection Actually Catches
- Do Garbage Disposals Need Lubrication?
- How Do You Clean the Splash Guard on a Garbage Disposal?
- What’s the Best Way to Keep a Garbage Disposal from Smelling?
- What Safety Precautions Matter Beyond Clearing Jams?
- How Often Should a Garbage Disposal Be Professionally Inspected?
- The Real Lesson Behind Disposal Maintenance
- Need a Professional Look at Your Disposal?
- Sources
- FAQ
What Can You Put in a Garbage Disposal Safely?
Most disposal failures trace back to the same handful of mistakes: too much grease, too many fibrous scraps, or feeding the unit faster than it can grind. The fix isn’t complicated, but it does require knowing what belongs and what doesn’t.
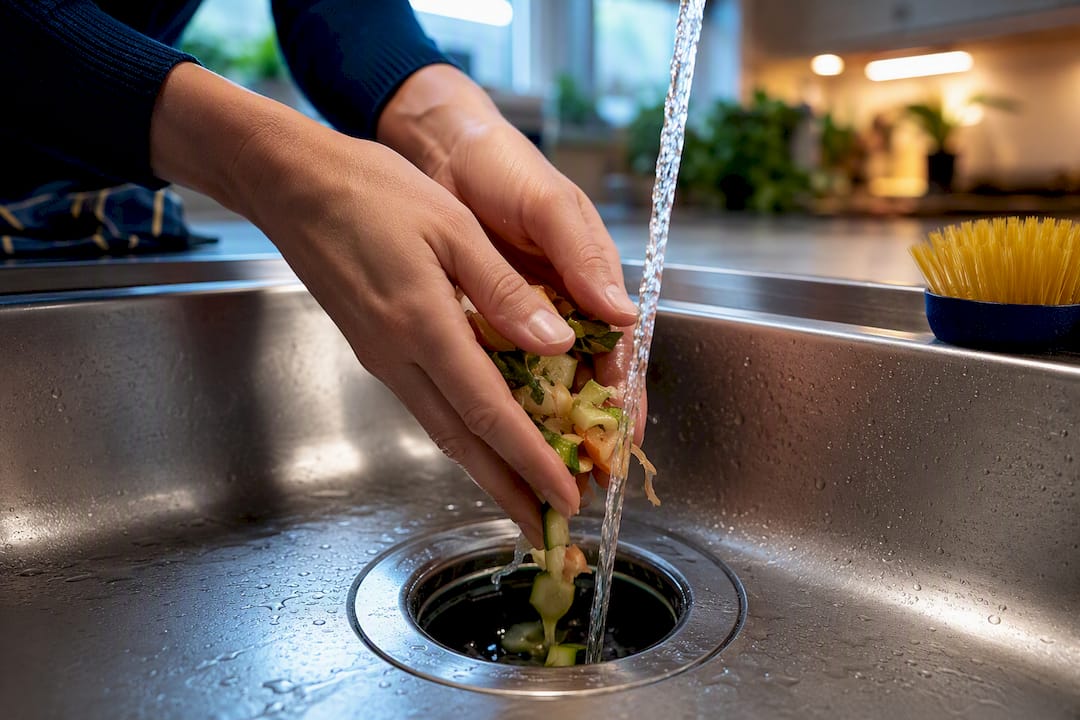
Small, soft food scraps are fine. Think fruit trimmings, cooked vegetables, and small bits of leftovers. Feed them in slowly, a handful at a time, with the water already running.
Keep these out of the disposal entirely:
- Grease, oil, and fat. They congeal in your pipes as they cool, and The Home Depot’s cleaning guide flags grease as one of the top causes of downstream blockages.
- Fibrous vegetables like celery, asparagus, and corn husks, which wrap around the impellers instead of grinding.
- Potato peels and other starchy foods, which turn into a paste that sticks to the chamber walls.
- Large bones and eggshells in volume. A stray shell is fine; a dozen at once builds up grit.
- Coffee grounds, which compact at the bottom of the trap over time.
- Glass, plastic, and metal. Obvious, but worth saying.
Limit each load to small amounts of scraps at a time rather than dumping in a full plate of leftovers. Finely ground waste is mostly water once it’s through the impellers, and InSinkErator’s own guidance notes it typically clears the sewer line fine when the water keeps running. The failures happen when people treat the disposal like a trash can instead of a grinder.
How Often Should You Clean a Garbage Disposal?
A short, repeatable routine beats a vague “clean it when it smells” approach, and it’s the kind of consistency This Old House’s maintenance guidance points to as the difference between disposals that last and ones that don’t.
- Daily: Run cold water for a few seconds before you start grinding, keep it running the whole time, and let it flow another 7 to 15 seconds after the unit stops, per Consumer Reports’ testing. This flushes loose particles out of the trap before they settle.
- Weekly: Drop in a handful of ice cubes with a spoonful of coarse salt and run the disposal. The ice scours the grinding chamber; the salt adds a little extra abrasion. Follow with citrus peels to freshen the smell.
- Monthly: Do a deeper clean with baking soda and vinegar, then scrub the splash guard by hand, and take a quick look underneath the sink for any small leaks starting to form.
That weekly ice-and-citrus habit does double duty: it knocks loose the biofilm that causes most disposal odors and keeps the impellers from sitting idle long enough to rust.
Pro Tip: Running your disposal for even 10 seconds every few days, even with nothing in it, keeps the impellers moving and prevents the seizing that happens when units sit unused for weeks.
How Do You Deep Clean a Garbage Disposal Safely?
Before you touch anything inside the unit, cut the power. Flip the breaker or unplug the disposal from under the sink. InSinkErator’s manufacturer guidance is direct about this: disposals use impellers, not blades, but they still cause serious injury if the unit powers on while your hand is inside.
For a quick freshening:
- Run cold water and drop in a cup of ice cubes along with a few tablespoons of coarse salt.
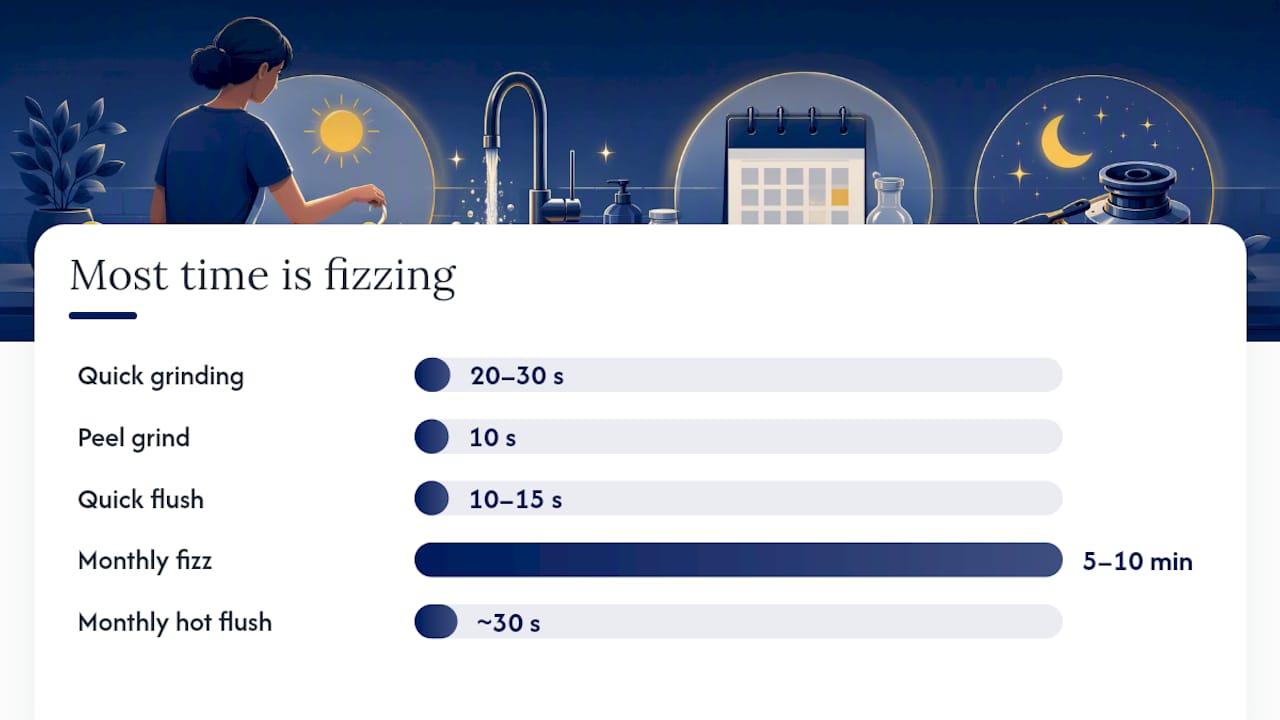
- Let the disposal run until the grinding noise turns smooth and quiet, usually 20 to 30 seconds.
- Add a few citrus peels (lemon or orange work best) and run for another 10 seconds.
- Flush with cold water for 10 to 15 seconds after you shut it off.
For the monthly deep clean:
- Turn off power at the breaker.
- Pour half a cup of baking soda into the drain, followed by a cup of white vinegar. Let it fizz for 5 to 10 minutes; this loosens grime clinging to the chamber walls, per Consumer Reports.
- Flush with hot water for about 30 seconds to carry the loosened residue out.
- Remove the splash guard (many are dishwasher-safe, but check your model) and scrub both sides with an old toothbrush and dish soap.
- Restore power and run cold water for a final 10 to 15 seconds with the unit on.
Skip lye-based or chemical drain cleaners entirely. Consumer Reports and manufacturer guidance both warn that these corrosive formulas eat away at the plastic and metal components inside the unit, which shortens its life instead of extending it.
How Do You Fix a Jammed or Humming Garbage Disposal?
A humming disposal that won’t spin almost always means something is jammed against the impellers, not that the motor has failed. Here’s how to work through the common failures in order, cheapest fix first.
- Humming but not spinning: Cut the power immediately. Find the hex-shaped socket at the bottom center of the unit and insert an Allen wrench, turning it back and forth gently to free whatever’s stuck. Once it spins freely, use tongs, never your hand, to pull out the object. If there’s no hex socket on your model, stop and call a technician rather than forcing anything.
- No power at all: Press the small reset button on the bottom of the unit, usually red. Check the breaker next, then inspect the outlet and plug for damage.
- Draining slowly: The disposal itself may be fine; check the P-trap underneath for a clog. If clearing the trap doesn’t fix it, the blockage is likely further down the line and worth a plumber’s attention.
- Leaking: Water at the top flange or around a hose clamp is often a loose connection or worn gasket, both fixable. A leak from the bottom housing is different. As AppliancePartsPros explains, that usually means the internal seal has failed, and the unit isn’t designed to be rebuilt from that point.
Pro Tip: Keep an Allen wrench sized for your disposal model taped to the cabinet under your sink. It’s the single most useful $3 tool for avoiding an emergency service call.
When Should You Repair vs. Replace a Garbage Disposal?
Budget models typically run several years with regular care; mid-range and premium units with stainless components often last longer. Where your unit falls in that range should factor into every repair decision you make.
Replace rather than repair when any of these show up:
- A leak from the bottom housing, which signals internal seal failure rather than a fixable part.
- The reset button trips repeatedly, even under normal use.
- Grinding takes noticeably longer than it used to, or leaves chunks behind.
- Bearings sound loud or grinding, not just humming.
- A repair quote runs more than about half the cost of a new unit.
An inspection earns its cost once a disposal is past the five-year mark and showing any of these symptoms together, since a technician can often tell in minutes whether you’re looking at a $150 fix or a unit on its last year. Waiting until it fails completely usually means dealing with the mess at the worst possible time.
What a Professional Inspection Actually Catches
Another Cycle Appliance Repair has spent nearly 20 years doing in-home repairs across Southern New Hampshire, and disposal calls follow a predictable pattern: the problem is rarely just what the homeowner noticed.
A typical service visit checks the mounting flange for a loose seal, inspects hose clamps and drain connections, tests the reset and electrical components, and confirms whether the unit’s internal seals are still intact. That last part matters most, because a technician can spot early seal wear before it turns into a leak that damages your cabinet floor.
Bottom-housing leaks and anything electrical are where DIY should stop. A pro can tell you within minutes whether it’s worth repairing or time to talk replacement options.
Do Garbage Disposals Need Lubrication?
Garbage disposals don’t need oil or grease on their moving parts the way a car engine does, and adding any lubricant to the grinding chamber will do more harm than good. The impellers ride on sealed bearings that are lubricated at the factory and aren’t meant to be serviced by hand.
What actually keeps those bearings healthy is motion, not oil. Running the unit regularly, even for a few seconds every couple of days, keeps the impellers turning and prevents the kind of corrosion that seizes bearings on disposals left idle for weeks. That’s part of why vacation homes and rarely used kitchen sinks tend to burn through disposals faster than heavily used ones.
The one place lubrication does apply is the mounting hardware. If you or a technician ever remove the disposal for service, a light coat of plumber’s grease on the rubber gasket where the unit seats against the sink flange makes reassembly easier and helps the seal sit evenly. That’s a job-specific step, not a routine maintenance task.
If your disposal starts making a grinding, squealing, or rattling noise that wasn’t there before, that’s usually a bearing issue rather than something oil can fix. At that point, the unit is signaling wear that maintenance won’t reverse, and it’s worth having someone look at whether a repair makes sense or if you’re closer to replacement territory.
How Do You Clean the Splash Guard on a Garbage Disposal?
The rubber splash guard, that black flexible baffle sitting right at the top of the drain opening, is the single most overlooked source of disposal odor. Food particles get trapped in its folds constantly, and most people never think to check it because it looks clean from above.
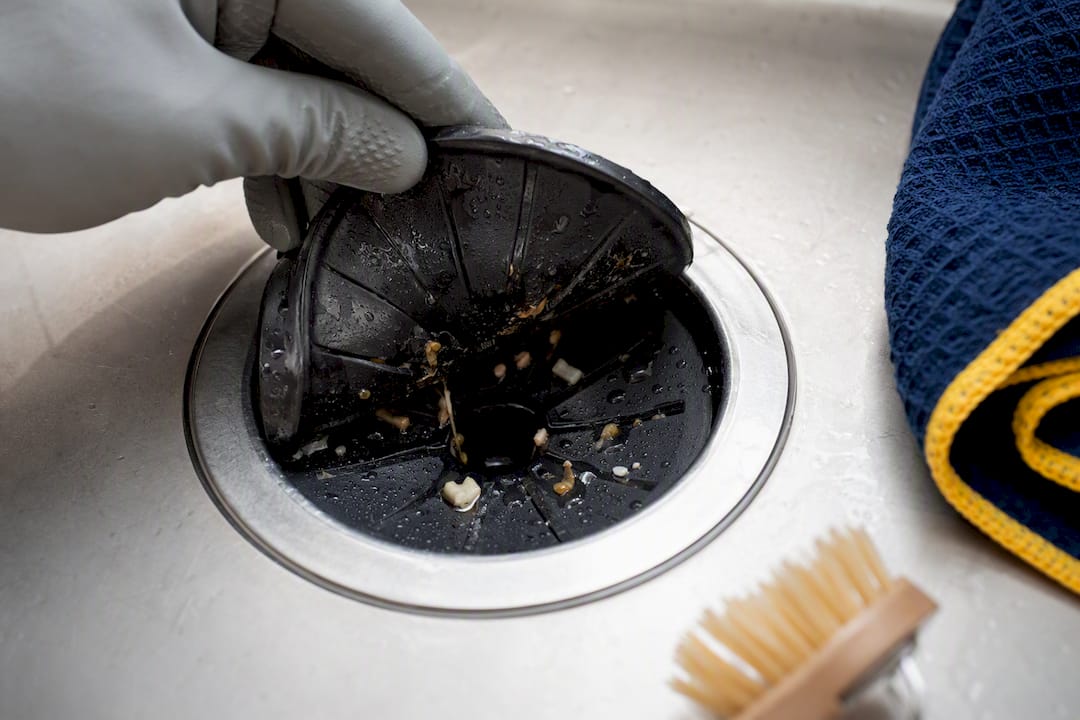
Pull it out (most models allow this without tools) and flip it over. The underside is almost always where the buildup hides, and cleaning guides that focus specifically on this spot note that a thorough scrub here resolves persistent smells that baking soda and vinegar alone never touch.
To clean it properly:
- Remove the guard from the drain opening.
- Check your model. Many are dishwasher-safe on the top rack.
- If hand washing, use a small brush or old toothbrush with dish soap to scrub both sides, focusing on the underside folds.
- Rinse thoroughly and check for any tears, stiffness, or missing flaps before reinstalling.
A cracked or missing flap isn’t just a cleaning problem. It lets debris splash back up while the unit runs and reduces how well the guard contains water and food particles during grinding. Replacement guards are inexpensive and widely available for most disposal models, and swapping one out takes a few minutes.
What’s the Best Way to Keep a Garbage Disposal from Smelling?
Odors that come back after a normal cleaning usually mean the smell isn’t coming from where you’re cleaning. Standing water in the trap, buildup on the splash guard’s underside, or grease coating the grind chamber walls are the usual culprits, and each needs a slightly different fix than a quick rinse.
Citrus peels handle surface odor well, but they’re a masking agent more than a cure if the underlying buildup is still there. Run them through after your ice-and-salt cycle, not instead of it. Lemon and orange rinds work better than lime for this because they release more oil as they grind.
For a longer-lasting fix, try dropping a few whole cloves or a spoonful of dried herbs like rosemary through with running water once every couple of weeks. It’s a small habit that keeps the chamber smelling neutral between your regular cleanings rather than just covering up an existing smell.
If odor keeps returning within a day or two of cleaning, check for standing water sitting in the disposal chamber itself. That usually points to a partial clog downstream rather than anything happening inside the unit, and no amount of citrus or baking soda will fix a drainage problem sitting past the trap.
What Safety Precautions Matter Beyond Clearing Jams?
Jam clearing gets most of the safety attention, but plenty of disposal injuries happen during routine cleaning, not repair.
- Always disconnect power before reaching toward the drain opening, even just to check the splash guard, not only when you’re actually clearing a jam.
- Wear a rubber glove when hand-scrubbing the splash guard or chamber interior. Sharp impeller edges and broken glass fragments from past mishaps are a real risk even with power off.
- Never use your hand to test whether the unit is truly off. Flip the breaker, not just the wall switch, since some installations wire the switch separately from the outlet.
- Keep long hair and loose sleeves back when leaning under the sink to inspect hose clamps or the mounting flange.
- Let hot water and any chemical cleaner residue cool and clear fully before touching the chamber by hand.
Pro Tip: If your disposal has a wall switch and an under-sink outlet, don’t assume flipping the switch cuts all power. Unplug the unit directly, or kill the breaker, before any hands-on work.
How Often Should a Garbage Disposal Be Professionally Inspected?
Most disposals don’t need a scheduled professional visit every year the way a furnace does, but a checkup makes sense on a specific timeline rather than a random one.
Have a technician look at your disposal once a year if it’s more than five years old, even if nothing seems wrong. That’s typically when internal seals begin wearing down, well before a visible leak shows up. Units under five years old with no symptoms can usually skip the annual visit and rely on the maintenance routine above.
Outside of scheduled checkups, get an inspection anytime you notice the reset button tripping more than once in a week, any moisture under the sink cabinet, or a grinding sound that wasn’t there a month ago. Waiting on these symptoms rarely makes them go away on their own, and a bottom-housing leak in particular tends to progress from a small drip to cabinet water damage faster than people expect.
If you’re already having other kitchen appliances serviced, it costs little extra time for a technician to check the disposal while they’re there, and bundling it into an existing appliance maintenance plan keeps you from having to remember the schedule yourself.
The Real Lesson Behind Disposal Maintenance
Most disposal advice online treats maintenance like a chore list: do these five things and your unit lasts forever. It doesn’t work that way. The research on disposal failure points somewhere more specific: the units that fail early almost always failed because of a handful of specific mistakes, not a lack of general effort. Grease down the drain. Skipping the water flush. Ignoring a slow drain for months.
What conventional advice gets wrong is treating cleaning and prevention as the same thing. Cleaning your disposal weekly won’t save it from grease buildup if you’re still pouring bacon fat down the drain between cleanings. The habits that actually extend lifespan are the boring, small ones done consistently: water running before you start, scraps kept small, and letting the flush run a few extra seconds at the end.
Where I’d push back hardest is on the DIY-everything mindset. But a bottom-housing leak is not a DIY project, no matter how many videos suggest otherwise. That seal failure marks the end of a unit’s service life, and pretending otherwise just delays the water damage.
— Rich
Need a Professional Look at Your Disposal?
If you’ve worked through the cleaning routine and the jam-clearing steps above and something’s still off, that’s exactly the point where a technician earns their fee instead of costing you money. Some professional appliance repair services handle disposal diagnosis, leak repair, flange reseating, and full replacements, often with transparent pricing quoted before any work starts and a warranty on parts and labor.
Unlike guessing your way through a second or third DIY attempt, a service call gets you a straight answer: repair or replace, with a price attached before anyone touches your sink. If you’re seeing a leak at the bottom housing, repeated reset trips, or just want a disposal checked before it becomes an emergency, you can schedule service online or check service availability in your town today.
Sources
- How to Clean Your Garbage Disposal – Consumer Reports
- How to Clean a Garbage Disposal – The Home Depot
- How to Keep Your Garbage Disposal Running Smoothly – This Old House
- 4 ways to a garbage disposal that’s leaking from the bottom – AppliancePartsPros
FAQ
Do garbage disposals need regular maintenance?
Yes. A short weekly and monthly routine, cold water, ice, citrus, and a baking soda and vinegar rinse, prevents most of the odor and clog problems that lead to repair calls.
Is it okay to put baking soda and vinegar in the garbage disposal?
Yes, and it’s one of the most effective monthly deep-clean methods, since the fizzing action loosens grime that a plain water rinse leaves behind, according to Consumer Reports.
Do I need to lubricate my garbage disposal?
No. The internal bearings are sealed at the factory and don’t need added oil or grease; running the unit regularly is what keeps the moving parts from seizing.
How do you service a garbage disposal?
Routine service means daily water flushes, weekly ice and salt scouring, and a monthly baking soda and vinegar clean with the splash guard scrubbed by hand. For internal issues like leaks or persistent trips, a professional inspection through a service like Another Cycle Appliance Repair can confirm whether repair or replacement makes more sense.